
Chargebee Integration is a WooCommerce extension that adds a Chargebee payment gateway, a Chargebee Subscription product type, and Chargebee.js Elements on checkout. Chargebee Product Catalog 2.0 is the billing engine; WooCommerce stays the storefront.
Requirements
- WordPress 6.2 or higher
- WooCommerce 8.0 or higher
- PHP 8.1 or higher
- Your own Chargebee site, full-access API key, and (for Elements checkout) a publishable key
- A Chargebee payment gateway (Stripe, Braintree, or another processor Chargebee supports) configured for your store currency before you enable Chargebee in WooCommerce
Install and license
- Buy Chargebee Integration on munjr.com. After checkout you receive a Munjr license key (the Chargebee subscription ID from the order).
- Install the plugin zip on the WordPress site where you sell subscriptions (Plugins → Add New → Upload).
- Go to Settings → Munjr License (also listed on WooCommerce → Settings → Chargebee).
- Paste the key into Munjr license key and click Activate license. One site per subscription.
When we publish a new plugin version, the zip on your munjr.com order download is replaced. See the changelog.
Where the license lives
munjr.com sells both plugins through Chargebee. Recurly Integration and Chargebee Integration both use that Chargebee subscription ID as the license key.
Setup and configuration
Open WooCommerce → Settings → Chargebee.
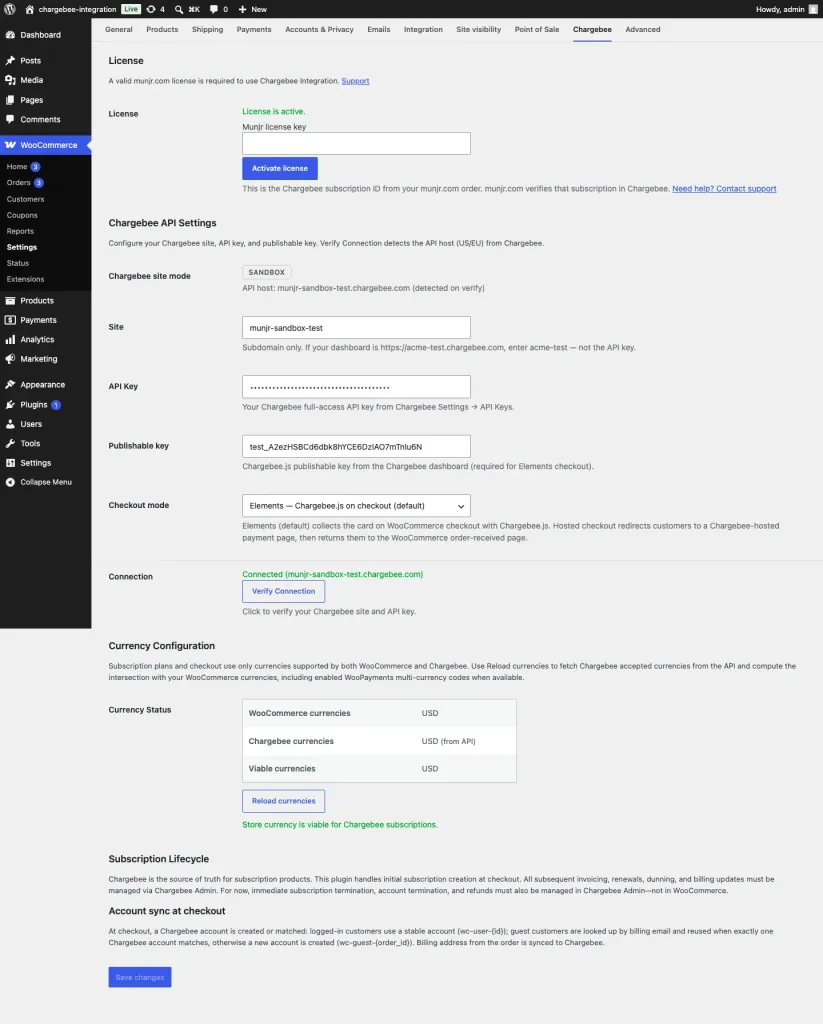
Chargebee API
- Enter Site — the subdomain only. If the dashboard is
https://acme-test.chargebee.com, enteracme-test. - Enter your Chargebee full-access API key (Chargebee → Settings → Configure Chargebee → API Keys). Do not paste the publishable / Chargebee.js key here.
- Paste the publishable key from the Chargebee dashboard (required for Elements checkout).
- Choose Checkout mode: Elements collects the card on WooCommerce checkout with Chargebee.js (default). Hosted redirects the customer to a Chargebee-hosted payment page, then returns them to the WooCommerce order-received page.
- Click Verify Connection. The plugin probes
chargebee.comthenchargebee.euand stores the host that answers. A site-mode badge (Sandbox or Production) appears after a successful verify. - Click Save changes.
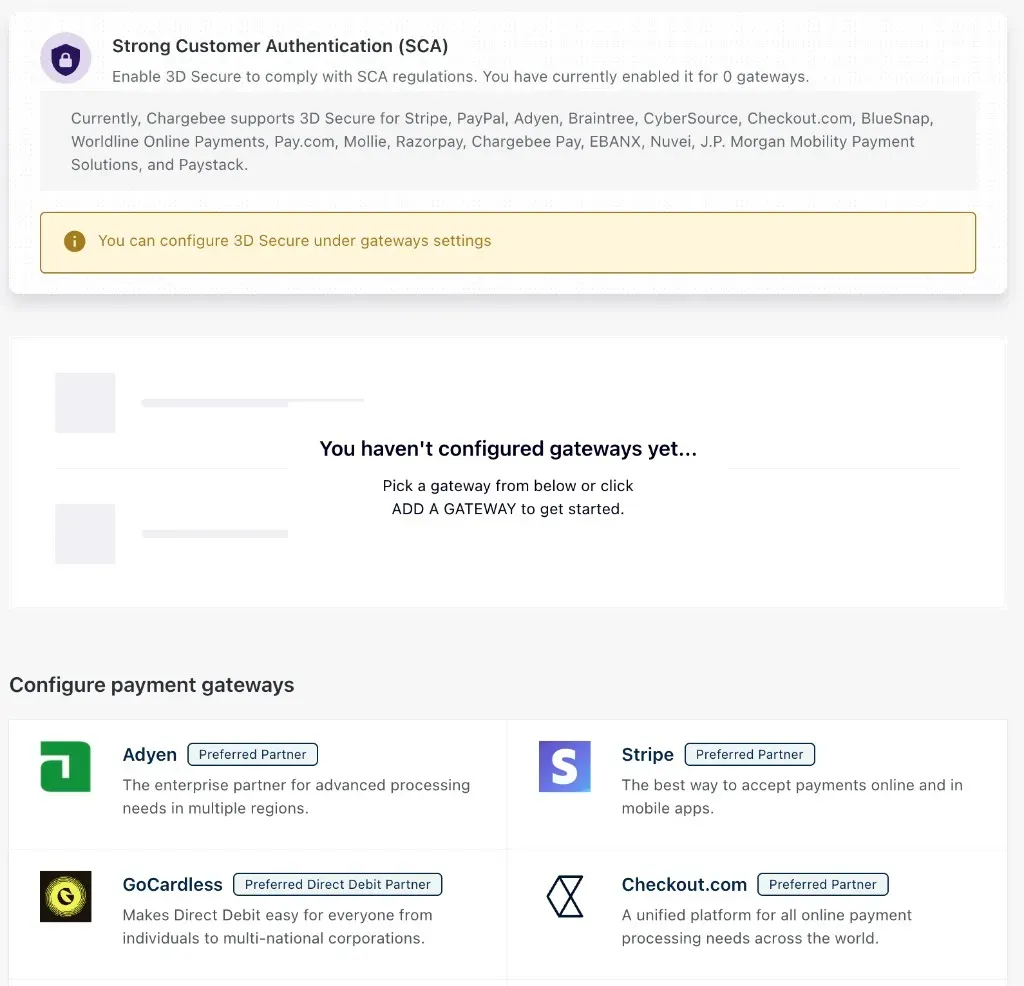
Configure Chargebee payment gateways first
Chargebee Integration tokenizes cards and creates the subscription. Chargebee still needs its own payment processor for your store currency. Configure that in the Chargebee dashboard before you enable Chargebee under WooCommerce → Settings → Payments.
Do this before enabling Chargebee in WooCommerce
If Chargebee shows “You haven’t configured gateways yet…”, checkout fails with Gateway configuration for currency: USD unavailable (or your store currency). Enabling the WooCommerce Chargebee gateway is not enough.
- In Chargebee go to Settings → Configure Chargebee → Payment Gateways.
- Click Add a Gateway and connect a processor for this Chargebee site (Stripe is typical). Use a live processor on a live Chargebee site.
- Open Manage Rules and assign that gateway for Cards and your store currency.
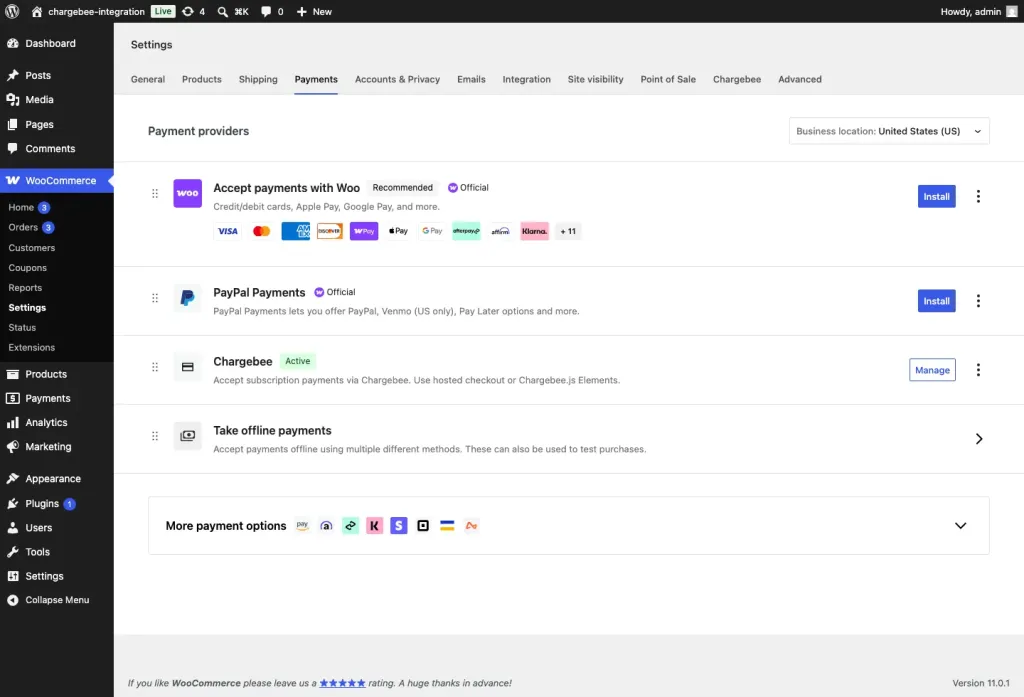
- Then enable Chargebee under WooCommerce → Settings → Payments.
Enable the payment gateway
After a Chargebee payment processor is configured for your currency, go to WooCommerce → Settings → Payments and enable Chargebee. The gateway only appears at checkout when the cart contains Chargebee subscription products.
Currency
Plans and checkout use only currencies supported by both WooCommerce and Chargebee. Click Reload currencies after you verify the connection. If your store currency is not in the viable set, subscription checkout is blocked until you align currencies.
Create a subscription product
- Create or edit a WooCommerce product.
- Set Product type to Chargebee Subscription.
- Open the Subscription Plan Config tab.
- Set term length, price, billing period, optional trial, auto-renew, and tax exempt.
- Keep the product in Draft until Chargebee creates the plan, then publish.
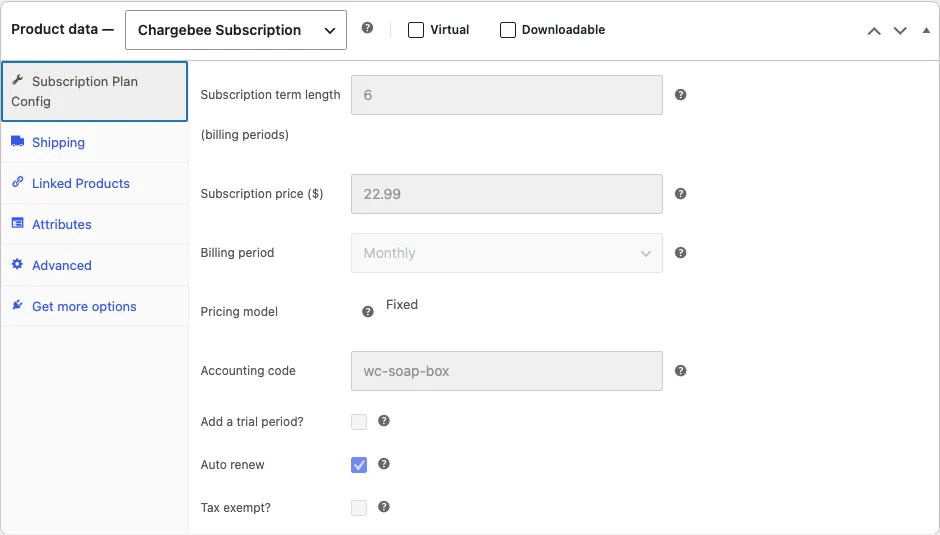
On save, the plugin creates Catalog 2.0 item family woocommerce, item wc-{product_id} (plan), and item price wc-{product_id}-{CURRENCY}. That item price id is stored as the plan code and used at checkout.
Plans are locked after creation
After a Chargebee plan exists, pricing and billing fields are read-only in WooCommerce. Change the plan in the Chargebee dashboard, then click Sync from Chargebee. To sell a different price, create a new product.
If plan creation fails, the product stays in Draft. Fix the settings and click Retry plan creation or Publish again.
Trials
Enable Add a trial period? and set length/unit. The shop and product pages show a Free X days|months trial badge. In the cart and checkout, the WooCommerce line shows $0.00 with a trial label. Chargebee still creates the subscription using the plan you configured.
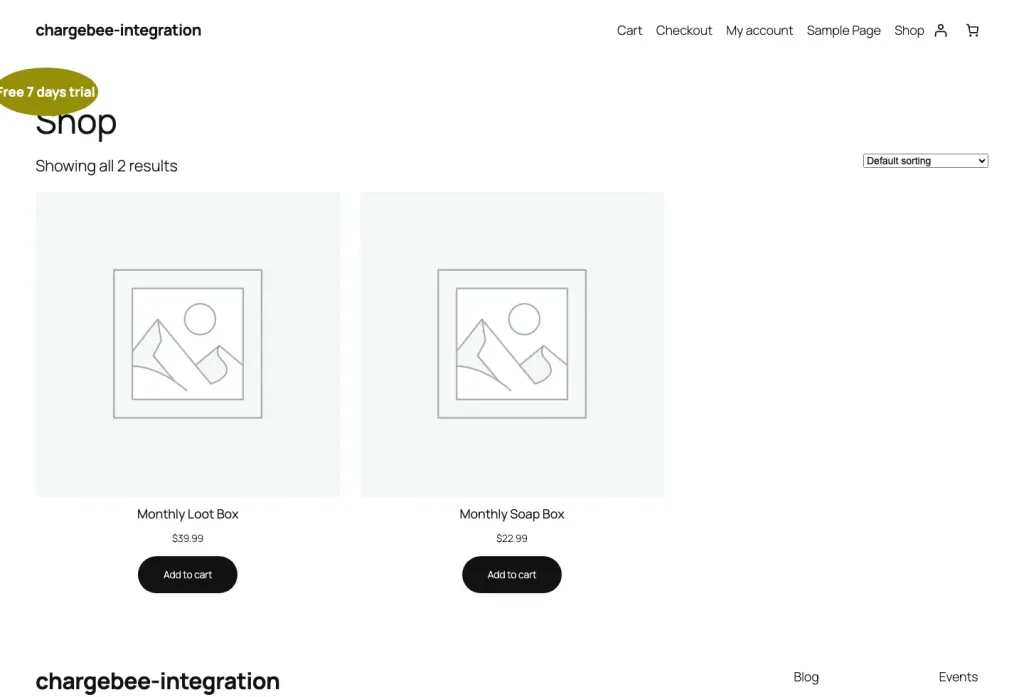
Trial requires billing info controls whether Chargebee.js collects a card for a $0 trial. Leave it on unless the Chargebee plan allows starting a trial without a payment method.
Checkout
Shoppers add a Chargebee Subscription product and check out on WooCommerce.
- Elements (default): Chargebee.js card fields appear on checkout. The card is tokenized in the browser; WordPress creates the Chargebee customer and subscription.
- Hosted: Place order → Chargebee hosted page → return to the WooCommerce thank-you page.
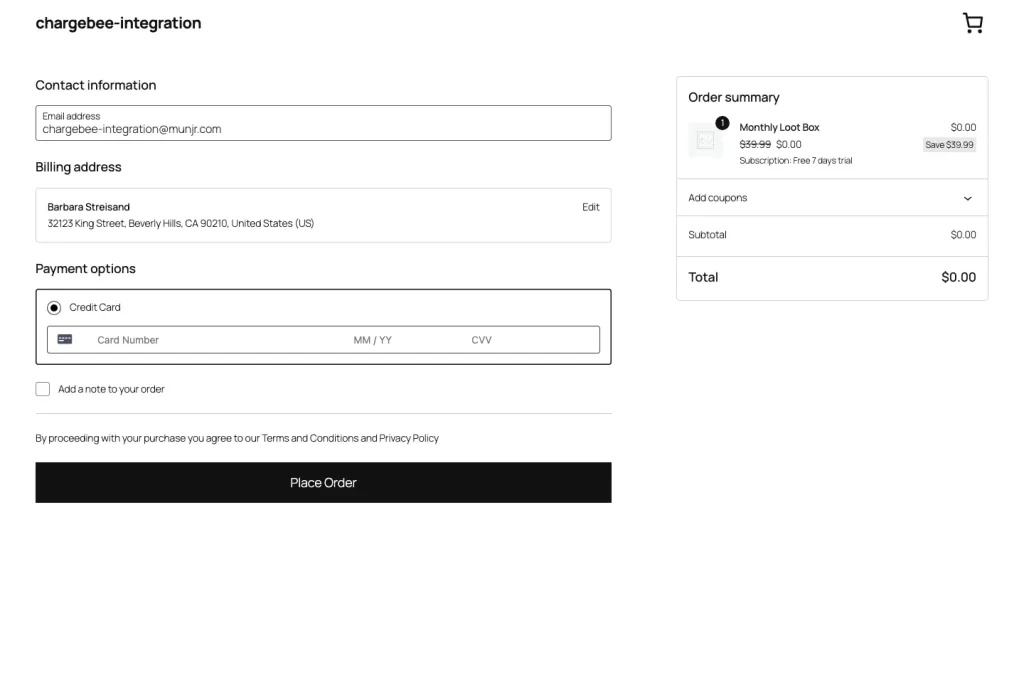
Logged-in customers reuse Chargebee customer wc-user-{user_id}. Guests are looked up by billing email: if exactly one Chargebee customer matches, that customer is reused; otherwise a new customer wc-guest-{order_id} is created. Billing address from the order is sent to Chargebee.
My Account
Logged-in customers get My Account → Manage Subscriptions (/my-account/chargebee-subscriptions/). They can:
- See subscriptions for their Chargebee customer
- Cancel at the end of the current billing period
- Reactivate a canceled subscription
- Open Manage in Chargebee (Chargebee Self-Serve Portal)
If that URL returns 404, open Settings → Permalinks and click Save once to refresh rewrite rules.
Enable the Chargebee Self-Serve Portal
Manage in Chargebee opens Chargebee’s Self-Serve Portal so the customer can update payment methods, invoices, and subscription details. That is Chargebee’s equivalent of Recurly hosted account management. Chargebee Hosted Pages are for checkout and collecting a payment method, not for ongoing subscription management.
The plugin signs the logged-in WooCommerce user in with a portal session. Chargebee only allows that when portal access is set to Via Single Sign-On API.
- In Chargebee go to Settings → Configure Chargebee → Checkout and Self-Serve Portal → Portal.
- Under Customers can access the self-serve portal, choose Via Single Sign-On API (not Via Chargebee Login).
- Publish the portal configuration.
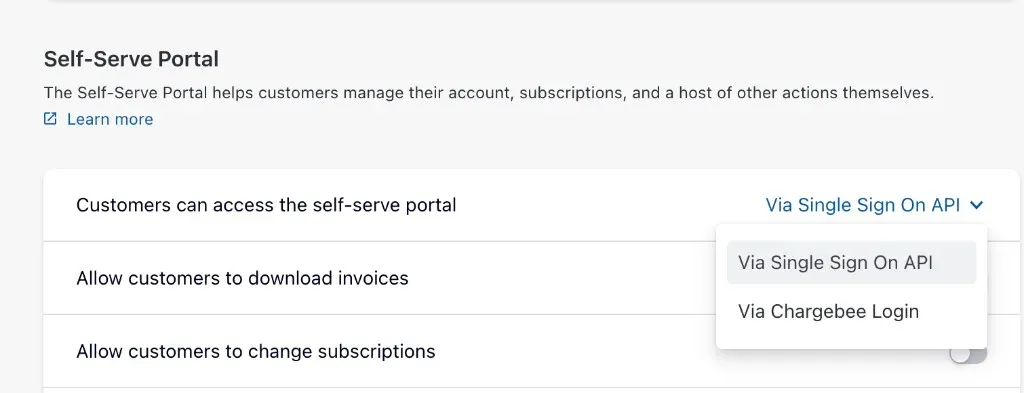
SSO API or Chargebee Login, not both
Chargebee lets customers enter the portal with Single Sign-On API or Chargebee Login (email OTP). This plugin needs SSO API. Cancel-at-period-end and reactivate on My Account still work without the portal.
How billing works
Chargebee is the source of truth after the first purchase. This plugin creates the subscription at checkout. Renewals, invoices, dunning, payment retries, immediate termination, account closure, and refunds are managed in Chargebee (or the customer portal), not in WooCommerce.
Limitations
- WooCommerce coupons cannot be used when the cart contains Chargebee subscription products.
- Mixed carts (subscription + one-time products) are blocked. Customers need to check out subscriptions separately.
- Variable / matrix products are not supported.
- Ramp pricing is not supported (fixed price per period only).
FAQ and troubleshooting
Verify Connection fails
Confirm the Site value is the subdomain only, the API key is a full-access key (not the publishable key), and the key belongs to that site. EU sites are detected automatically on verify.
Gateway configuration for currency unavailable
That message comes from Chargebee, not WooCommerce. Chargebee.js is sending the store currency, but the Chargebee site has no payment processor mapped to it. Add a gateway and Smart Routing rule as described in Configure Chargebee payment gateways first, then retry checkout.
No card fields on checkout
The cart must contain a Chargebee Subscription product, the Chargebee gateway must be enabled, checkout mode must be Elements, and a publishable key must be saved. Mixed carts hide the gateway.
Plan creation failed
Open the product, read the error on Subscription Plan Config, fix term/price/currency, and use Retry plan creation. The store currency must be in the viable Chargebee set.
Customer portal access via API is disabled
That message comes from Chargebee when Manage in Chargebee tries to create a portal session and the Self-Serve Portal is set to Chargebee Login (or API access is off). Switch portal access to Via Single Sign-On API and publish, as described in Enable the Chargebee Self-Serve Portal.
License will not activate
Use the Munjr license key from your munjr.com order (not a Chargebee API key). Each subscription licenses one WordPress site. If you moved hosts, deactivate the license on the old site first.
Changelog
Newest version first. When we ship an update, the zip attached to your munjr.com order download is replaced.
0.1.2 — September 10, 2026
- Fix: Chargebee.js Elements checkout no longer fails with
gateway_config_unavailable: Gateway configuration for currency: undefined unavailable. Card fields now receive the cart or store currency.
0.1.1 — September 8, 2026
- Fix: $0 free-trial carts still go through the Chargebee payment gateway so Chargebee creates the subscription (including
in_trial).
0.1.0
- Initial public release: Chargebee Catalog 2.0 plans, Elements or hosted checkout, munjr.com licensing, and My Account subscription management.
Support
Questions about Chargebee Integration, licensing, or an existing munjr.com subscription: Contact us. We typically respond within two business days. You can also follow all plugin docs.